Autopapyrus · Lada Niva Travel 1.7 16V (2025)
https://autopapyrus.com/catalog/lada/niva-travel/guides/clutch-release-fork-replacement/
https://autopapyrus.com/catalog/lada/niva-travel/guides/clutch-release-fork-replacement/
Compiled automatically from service literature and owner experience. Specs are for the typical configuration — check them against your exact car before you start.
Lada Niva Travel 1.7 16V (2025): Clutch Release Fork Replacement
The clutch release fork is located inside the clutch housing on the transmission, so the transmission must be removed together with the transfer case to replace it. The job is labor-intensive and is best done on a lift with a helper. The procedure below describes the general principle for a front-engine, all-wheel-drive layout. The exact procedure and torque specifications for this model are not documented in publicly available service materials, so all torque values below are approximate and must be checked against the manufacturer's specifications.
Parts
6| № | Part |
|---|---|
| 01 | Clutch release fork for Niva Travel manual transmission (1.7 engine)Find on Amazon → |
| 02 | Clutch release bearingrecommended to replace at the same timeFind on Amazon → |
| 03 | Clutch release fork guide bushingrecommended to replace at the same timeFind on Amazon → |
| 04 | Clutch kitif wornFind on Amazon → |
| 05 | Transmission oil for manual gearboxFind on Amazon → |
| 06 | Grease for clutch release fork splines and pivot pointsFind on Amazon → |
Amazon links search by the part name; use Amazon's fit check for your car before ordering. We may earn a commission from qualifying purchases.
Tools
9- Lift or inspection pit Amazon →
- transmission jack (or a floor jack suited for the transmission) Amazon →
- socket and wrench set Amazon →
- torque wrench Amazon →
- clutch disc alignment tool Amazon →
- syringe or container for fluid Amazon →
- container for draining transmission oil Amazon →
- jack stands Amazon →
- hose clamps or plugs for the hydraulic clutch line Amazon →
Step by step
20 steps- Put the vehicle on a lift or over a pit, set the parking brake, and chock the wheels. Disconnect the negative battery terminal.
- Remove the engine skid plate. Drain the oil from the transmission and the transfer case so it does not spill when they are removed.
- Remove the driveshafts: the front and rear shafts at the transfer case. Before removal, mark the flanges with paint so you can reassemble them in the same position. Tighten the flange fasteners to the manufacturer's specification.
- Remove the part of the exhaust system that interferes with lowering the transmission (downpipe, catalytic converter). Remove the heat shield and any brackets that block access.
- Disconnect the connectors and wires from the transmission: the speed sensor, the reverse light switch, and any position sensors on the transmission. Disconnect the shift lever and linkage (the gear selector mechanism and the shift linkage in the cabin).
- Detach the clutch slave cylinder from the housing. It is not necessary to disconnect the hydraulic line: move the cylinder aside together with the hose, without bending it sharply. If you do disconnect the hydraulic line, plug the open ends and bleed the system afterward.
- Disconnect the starter: remove the wires and mounting bolts, take out the starter, and set it aside.
- Place a jack under the transmission and secure it. Remove the crossmember or the rear powertrain mount fasteners (depending on your vehicle's design). Clear access to the bolts that join the transmission to the engine.
- Remove the bolts that secure the transmission to the engine. Tightening torque on installation is approximately 40-50 N·m (30-37 lb-ft) for M10-M12 bolts; use the exact value from the manufacturer's specification.
- Slide the transmission straight back along the axis of the input shaft until the shaft is completely clear of the clutch disc hub. Do not let the transmission hang on the input shaft. Lower the transmission and pull it out from under the vehicle.
- Remove the old fork from the housing: pull back the spring clip or remove the retaining clip, then lift the fork together with the release bearing off the pivot. Note the position of the spring and the retainers.
- Inspect the fork pivot (ball stud), the bushings, and the release bearing guide sleeve: replace them if worn or loose. Wipe out the housing and check the input shaft seal for leaks. If oil is leaking, replace the seal.
- Apply a small amount of special grease to the fork pivot and to the contact points with the bearing (do not use too much, so it does not get onto the disc).
- Install the new fork with the release bearing and secure it with the spring clip. Check that the fork swings freely and that the bearing slides along the guide sleeve without binding.
- Assess the condition of the pressure plate, clutch disc, and flywheel. If they are worn, replace the clutch as a set (pressure plate, driven disc, release bearing). When installing the pressure plate, use the alignment tool to center the disc, and tighten the pressure plate bolts in a crisscross pattern to the manufacturer's torque specification (approximately 20-30 N·m (15-22 lb-ft)).
- Apply a thin layer of grease to the transmission input shaft splines (splines only, not the end of the shaft). Raise the transmission with the jack and align the input shaft with the disc splines. If necessary, turn the transmission shaft slightly with a gear engaged, and carefully push it in all the way. Do not pull the transmission toward the engine with the bolts until the shaft is fully seated.
- Install the bolts that secure the transmission to the engine and tighten them to specification. Then reinstall, in reverse order, the mounts, the starter, the slave cylinder, the wiring, the shift linkage, the exhaust system, and the driveshafts (using the marks).
- Fill the transmission and the transfer case with oil up to the lower edge of the fill hole. If you opened the hydraulic line, bleed the clutch with DOT 4 brake fluid until the air is gone.
- Start the engine and press the clutch pedal several times with the transmission in neutral: the pedal must return fully, without sinking. With the vehicle stationary, check that all gears engage.
- Take a test drive of a few kilometers: make sure there is no vibration, noise when the clutch is pressed, slipping, or incomplete clutch release. Inspect the transmission seals for oil leaks.
Common mistakes and warnings
- The transmission is heavy, and together with the transfer case it must be securely fastened to the jack: removing and installing it alone is dangerous, so work with a helper
- Work only on a lift or on level ground with reliable jack stands
- If you have no experience working on drivetrains, it is better to leave this job to a repair shop
- A mistake in centering the disc or under-tightened driveshafts is dangerous
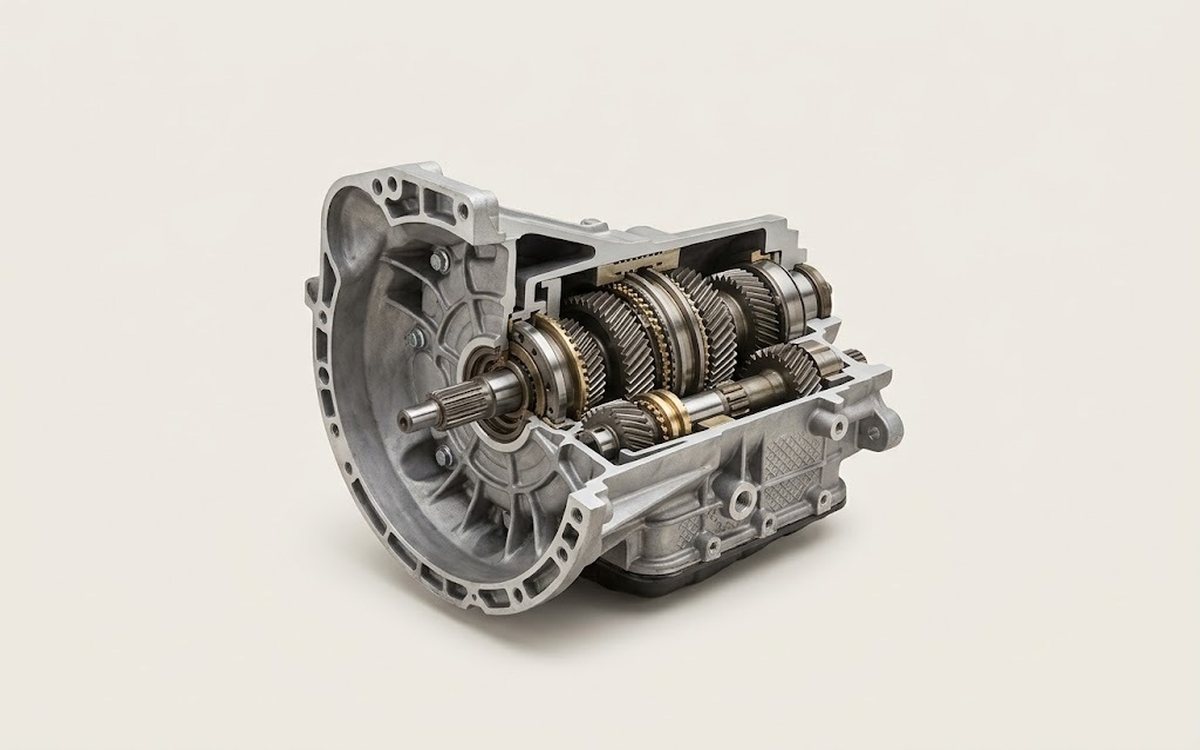 How it works · 3D
How a Manual Transmission Works
How the part you're working on actually works — in plain English, on a 3D model.
Open in 3D →