Autopapyrus · Chevrolet Onix 1.0 Turbo (2024)
https://autopapyrus.com/guides/chevrolet/onix/automatic-transmission-clutch-pack-replacement/
https://autopapyrus.com/guides/chevrolet/onix/automatic-transmission-clutch-pack-replacement/
Compiled automatically from service literature and owner experience. Specs are for the typical configuration — check them against your exact car before you start.
Chevrolet Onix 1.0 Turbo (2024): Automatic Transmission Clutch Pack Replacement
Friction plates are replaced when you have slipping, delayed or harsh shifts, loss of gears, dark oil with a burnt smell, and metal debris in the pan. This is a complete transmission teardown. If you lack automatic transmission rebuilding experience, a piston test bench and a clean work area, it is better to hand the job to a specialized transmission shop. The exact clutch pack clearances and torque values for your transmission are not documented in open sources, so what follows is a general procedure and rough guidelines.
Parts
4| № | Part |
|---|---|
| 01 | Automatic transmission rebuild kit (master kit): friction plates for all clutch packs, steel plates, rubber piston seals and sealing rings, gaskets |
| 02 | Automatic transmission filter |
| 03 | Transmission pan gasket |
| 04 | Automatic transmission fluid, Dexron VI ATF |
Tools
11- Vehicle lift
- transmission jack
- socket and wrench set
- torque wrench
- clutch pack spring compressor
- spring press
- compressed air for checking pistons
- caliper or feeler gauge
- oil drain pan
- container for ATF
- scan tool for adaptation after reassembly
Step by step
17 steps- Preliminary diagnosis. Read fault codes with a scan tool, check the ATF level and condition, clutch pressure adaptations and overheating. Slipping is sometimes caused not by the friction plates but by the solenoids, the valve body or a worn torque converter. These causes must be ruled out before disassembly.
- Disconnect the negative battery terminal. Raise the vehicle on the lift, remove the engine undercover and drain the ATF from the transmission into a container. Assess the color, smell and amount of metal debris in the oil and on the pan magnet.
- Remove everything that interferes with removal: the air filter with its ducts, the battery and its tray, wiring brackets, the shift cable or selector linkage, the transmission connectors, and the ATF cooler hoses (plug them). The location of these components depends on the body version and trim level.
- Disconnect the wheel drive components from the transmission (struts, ball joints or control arms, depending on the design), pull the driveshafts out of the transmission and secure them to one side. Plug the seals.
- Disconnect the exhaust section and the starter if they are in the way. Remove the bolts securing the transmission to the engine and the torque converter-to-drive plate bolts through the service opening.
- Position the transmission jack, disconnect the powertrain mounts and carefully lower the transmission. The engine must be held in place with a support from above. Take the torque for the mount and clutch housing bolts from the manufacturer's specification: for threads of this size it usually falls in the range of 40-100 N·m (30-74 lb-ft), depending on the bolt.
- Move the transmission to a clean bench. Remove the torque converter (keep it upright, it is full of oil), then remove the pan, filter and valve body. Do not lose the balls, springs and retainers; each must go back in exactly its original place.
- Disassemble the transmission: remove the pump, the clutch packs (drums) with their plates, and the planetary gear sets. Lay out the parts in the order of removal and photograph the intermediate stages. Count and measure the plates of each pack.
- Inspection: check the drums, pistons and passages for scoring and wear, the bushings, the steel plates for blue discoloration (overheating) and warping, and the springs and snap rings. Always replace the rubber piston seals. Replace worn drums and bushings, otherwise pressure will leak off and the new set of plates will not last long.
- Soak the new friction plates in clean ATF of the same type that will be filled into the transmission, for at least 30 minutes (or per the plate manufacturer's recommendation). Wipe down the steel plates. Keep the order and number of plates in each pack the same as at disassembly, or as specified in the rebuild kit's specification.
- Assemble the clutch packs with the new plates and piston seals. Check the pack free play: the clearance must be within the manufacturer's tolerance; adjust it by the thickness of the backing plates or retaining rings if the design allows. Check piston operation with compressed air: there should be crisp movement with no leaks.
- Install the clutch packs, planetary gear sets and pump, then the valve body with a clean filter and a new pan gasket. Tighten the valve body and pan fasteners to very low torque, on the order of a few N·m (up to 10-12 N·m (89-106 lb-in)), in a crisscross pattern. Use the exact values from the service manual.
- Flush the torque converter and the ATF cooler. It is better to replace the converter or have it tested on a bench if the oil was contaminated with metal debris. A dirty cooler will destroy the new plates.
- Install the transmission onto the engine in reverse order. Make sure the torque converter seats properly on the splines and in the drive plate, and tighten the bolts in the sequence and to the torque specified by the manufacturer. Install the driveshafts, mounts, selector cable and connectors.
- Fill with Dexron VI ATF in the amount specified in the service manual and bring the level to spec using the checking procedure (at the specified oil temperature, on level ground, via the check plug or dipstick, depending on the transmission design).
- Start the engine, cycle through all the selector positions with a pause in each, and check for leaks. Reset and relearn the adaptations with the scan tool. Then take a test drive with smooth acceleration so the transmission can adapt. For the first 500 km (310 miles), avoid hard launches and towing.
- After 1000-2000 km (620-1,240 miles), check the ATF level and condition and top up if necessary.
Common mistakes and warnings
- Working on an automatic transmission requires cleanliness, experience and special tools
- An error in clearances or plate order will lead to another transmission failure
- Always secure the vehicle on the lift and with stands, and never go under a suspended engine and transmission without reliable support
- If you have no experience disassembling automatic transmissions, leave the job to a specialized shop
- You may need to replace not only the friction plates but also the drums, torque converter or valve body: check them before reassembly
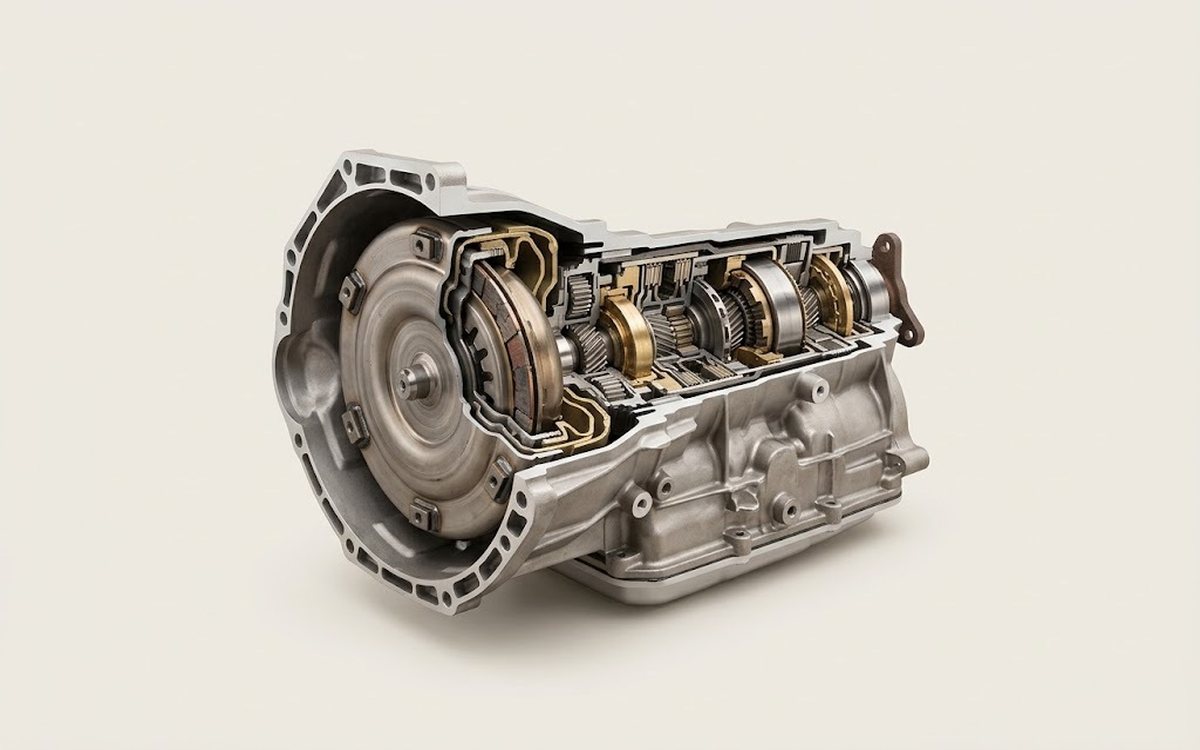 How it works · 3D
How an Automatic Transmission Works
How the part you're working on actually works — in plain English, on a 3D model.
Open in 3D →